


The Gmail promotions tab used to be the dreaded back row of the inbox. Now, there are ways to improve your chances of getting your emails into the primary inbox. However, Gmail has added another way for you to take advantage of the promotions tab, rather than trying to dodge it: Gmail annotations.
Gmail annotations enable you to make your emails more attractive in the inbox. That way your emails start getting the conversion before subscribers even open your emails.
Yes, using Gmail annotations will signal to Gmail that your emails are promotions. But the annotations give you access to more preview content than just the subject line and preheader text.
Annotations also give your emails an advantage in how the Gmail client sorts your emails in the promotions tab.
In case you’re wondering, Google doesn’t specify whether or not email annotations impact email deliverability. But annotating your emails definitely won’t make your deliverability worse.
Ultimately, email annotations can help improve your open rates and click-through rates. That’s what email marketers want. So we’ll show you how to use them, starting with the basics.
What are Gmail annotations?
A Gmail annotation is a snippet of HTML code that you add to the HTML header in your emails. The code snippet displays several pieces of information from your email in the inbox.
We’ll show you how to add the code snippet shortly. But Google has a tool that generates a Gmail annotation HTML template for you. All you have to do is customize the generated code snippet so it shows the information you want.
What you can show with Gmail annotations
There are five areas where you can add information and visuals with annotations. Obviously, you still get the usual subject line and sender name. But here’s what else you can add:

LOGO
Ordinarily, BIMI authentication is the only way to add a logo to your emails.
Not that there’s anything wrong with BIMI authentications. But Gmail annotations give you another way to add a logo to your emails. And adding a logo with Gmail annotations is simpler, even though your logo will only display in the Gmail promo tab.
DISCOUNT DEAL BADGE
If there’s a discount inside your email, you can choose to display that discount in the inbox. That way people know exactly what they get for opening your email.
DISCOUNT CODE
You can also display the discount code in the inbox. Psychologically, this validates the discount code. It helps remove skepticism about the promo code because it’s less nebulous than just claiming there’s an offer code in the email message.
And it gives subscribers yet another way to use the promo code if they just need to quickly copy and paste the code.
DISCOUNT CODE EXPIRATION DATE
Adding an expiration date for the discount inside the email adds urgency—a proven tactic for increasing conversions—to open your emails and click through. That way people don’t procrastinate opening your email until after the discount has expired.
BANNER
The banner is an image that displays beneath all the other information. When you combine the banner with all the other information, it turns your email into a mini advertisement right in the customer’s inbox. No email opening necessary.
FEATURED EMAILS
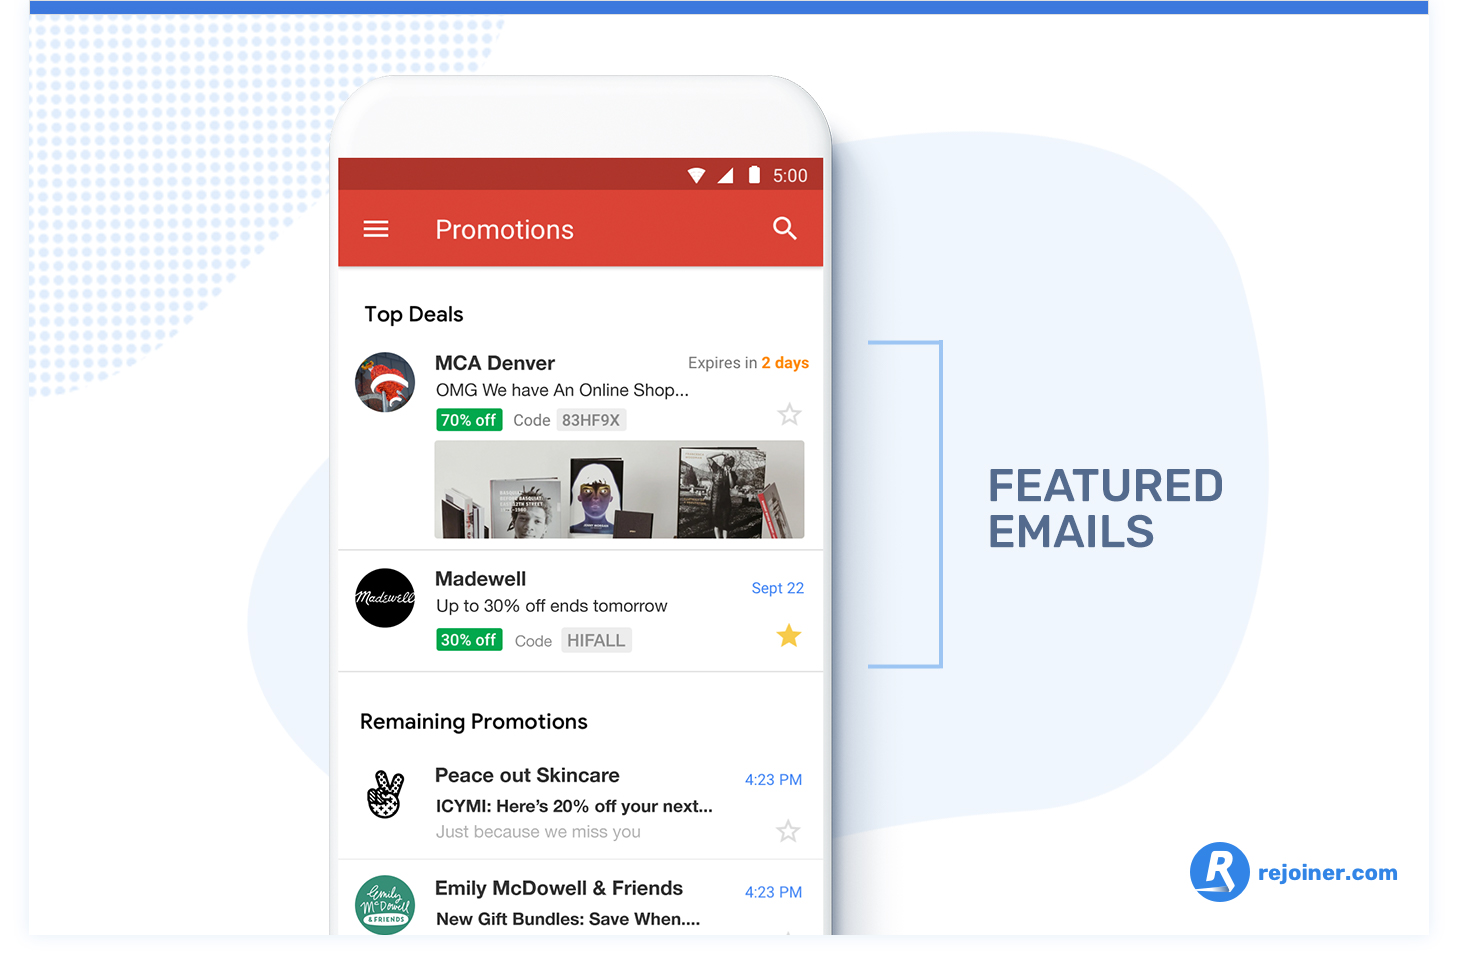
You don’t have perfect control over this aspect. But Gmail has a method for sorting promotional emails according to the Gmail users’ interests (it’s reportedly based on the same microdata Google uses for ad targeting). Annotated emails that closely match the user’s interests get displayed at the top of the list in the promotions tab.
Obviously, you don’t have perfect control over this aspect. However, if you’re using double opt-ins and purposefully building your email lists, your emails should get featured at the top of the promotions tab fairly frequently.
PROMOTIONAL REMINDERS
The last benefit of using Gmail annotations is that they sort of get your promotional emails out of the promotions tab.
Occasionally, the Gmail client will display reminders in the primary tab that let subscribers know they have promotional emails waiting in the promotions tab, with a small preview of the promotional emails.
Only annotated emails get featured in this reminder. So, even though annotating your emails might guarantee they land in the promotions tab, Google will give your annotated emails some visibility in the primary inbox.
Also, annotated emails with a discount expiration date get two opportunities to be featured in the inbox reminder: once when the email is sent, and again 3 days before the discount expires. Emails without a discount expiration date won’t always be featured twice in the inbox reminder.
As you can see, Gmail annotations enable you to make an offer to customers before they even open the email. That makes opening your emails a more compelling proposition and therefore increases your email marketing performance.
That’s what you can do with Gmail annotations (and our case for using them). Now, here’s how to annotate your emails.
How to use Gmail annotations to improve your email marketing performance
Implementing Gmail annotations is pretty straightforward. If you have an email development team, they can do it in literally minutes (maybe seconds, if your email developer is really good).
Before you get started, there’s one last thing you need to know: Gmail annotations only affect how emails are displayed in the Gmail mobile app.
Gmail has indicated that they may expand email annotations to work in desktop instances of Chrome. But, right now, the functionality of Gmail annotations is limited to the Gmail app (on both Android and iOS, of course).
Tons of people use Gmail on their phones, though. So it’s worthwhile for email marketers to add Gmail annotations to their emails.
With that said, here’s the prep work and best practices for implementing Gmail annotations:
CHOOSE OR CREATE A LOGO FOR YOUR ANNOTATED EMAILS
Google doesn’t specify how big or small your email logo can be. But the logo must be resized to fit the logo space in the inbox. So it’s best to use a logo image that’s small enough that it requires minimal resizing to fit.
Google also doesn’t specify a file type in their documentation. But, in most other places where Google allows logos, they recommend using a PNG file. GIF files are also acceptable.
Based on what we know about email logos, a PNG file with a small square logo is your best option.
Also, make sure you have a URL for accessing your logo file. Your logo URL should be an HTTPS URL.
An HTTP URL will work for now. But Google has indicated that they may remove support for HTTP URLs in the future.
GENERATE A ONE-TIME USE DISCOUNT CODE
We’ve talked about dynamic discount codes before. Using a static discount code is unwise because it can be easily shared and abused.
But, regardless of whether you use a static or dynamic code, it’s best to keep your discount code relatively short, because it has to fit into the limited visual space in the inbox.
Also, the word “CODE” is always displayed in front of your discount code. Avoid getting too clever with your discount code in an effort to add messaging to your email preview. It will most likely sound silly when it gets paired with “CODE.”
A simple code like “FREESHIP” or anything else that looks like a discount code will work best.
SET A DISCOUNT EXPIRATION DATE
If your discount code expires, you can set that in your Gmail annotation. It will display in the email preview. And Gmail will send a reminder when the expiration date gets close.
You’ll need two dates to set the expiration date: a discount availability start date and an expiration date.
Choosing the dates is easy. The important thing is to get the date formatting correct.
Google recognizes dates like this:
2020-11-09T00:01:01-0800
It looks a bit strange. Here’s what it means:
“2020-11-09” is the date, with the year first and the day last.
“T00:01:01” is the time, in 24-hour format, including seconds. Remember to include the seconds in your dates. Otherwise, the time will be super wrong.
“-0800” is the timezone. “-0800” is Pacific Standard Time. If you check the timezone setting on your computer, it will usually show you the number you need to set the timezone for your Gmail annotations (the number is just the difference between your time and Greenwich Mean Time).
The important thing here is that you format the date and time correctly, so Google can recognize it.
CHOOSE A DISCOUNT DEAL BADGE
The deal badge is the discount that the customer will get when they use the discount code.
Your discount badge should be four words or less. Something like “10% off” is the clearest and most effective. Anything longer will most likely get truncated because the deal badge shares space with your subject line.
Just like the discount code, avoid getting too clever in this space. Use your deal badge to display the discount. Adding things like, “OPEN NOW” or other messaging tends to look spammy. And it’s just not as enticing as a discount.
Also, Google recommends against putting other information in this space. So it’s possible that Google may develop ways to filter out emails with other information in this field in the future.
So only use the deal badge to display a discount.
CHOOSE OR CREATE A BANNER IMAGE
The banner image displays beneath your discount badge and discount code.
Your banner image can be any size. But keep in mind that the image will be automatically cropped to fit. Avoid using images with important visuals near the edges of the frame.
You can avoid cropping if your image is 538 x 138 pixels, with a 3.9 aspect ratio. And, as usual, PNG is the ideal file format.
You’ll need a URL where your banner image is stored. An HTTPS URL works best.
Once you have everything read, all you need to do is plug the information into the Gmail annotations code snippet.
Adding your information to the Gmail annotations code snippet
If you’re doing all this yourself, we recommend using the Gmail promotions tab annotation guide to create your customized code snippet. It enables you to add your information and use an image preview to make sure the code is correct (previewing the code is strongly recommended).
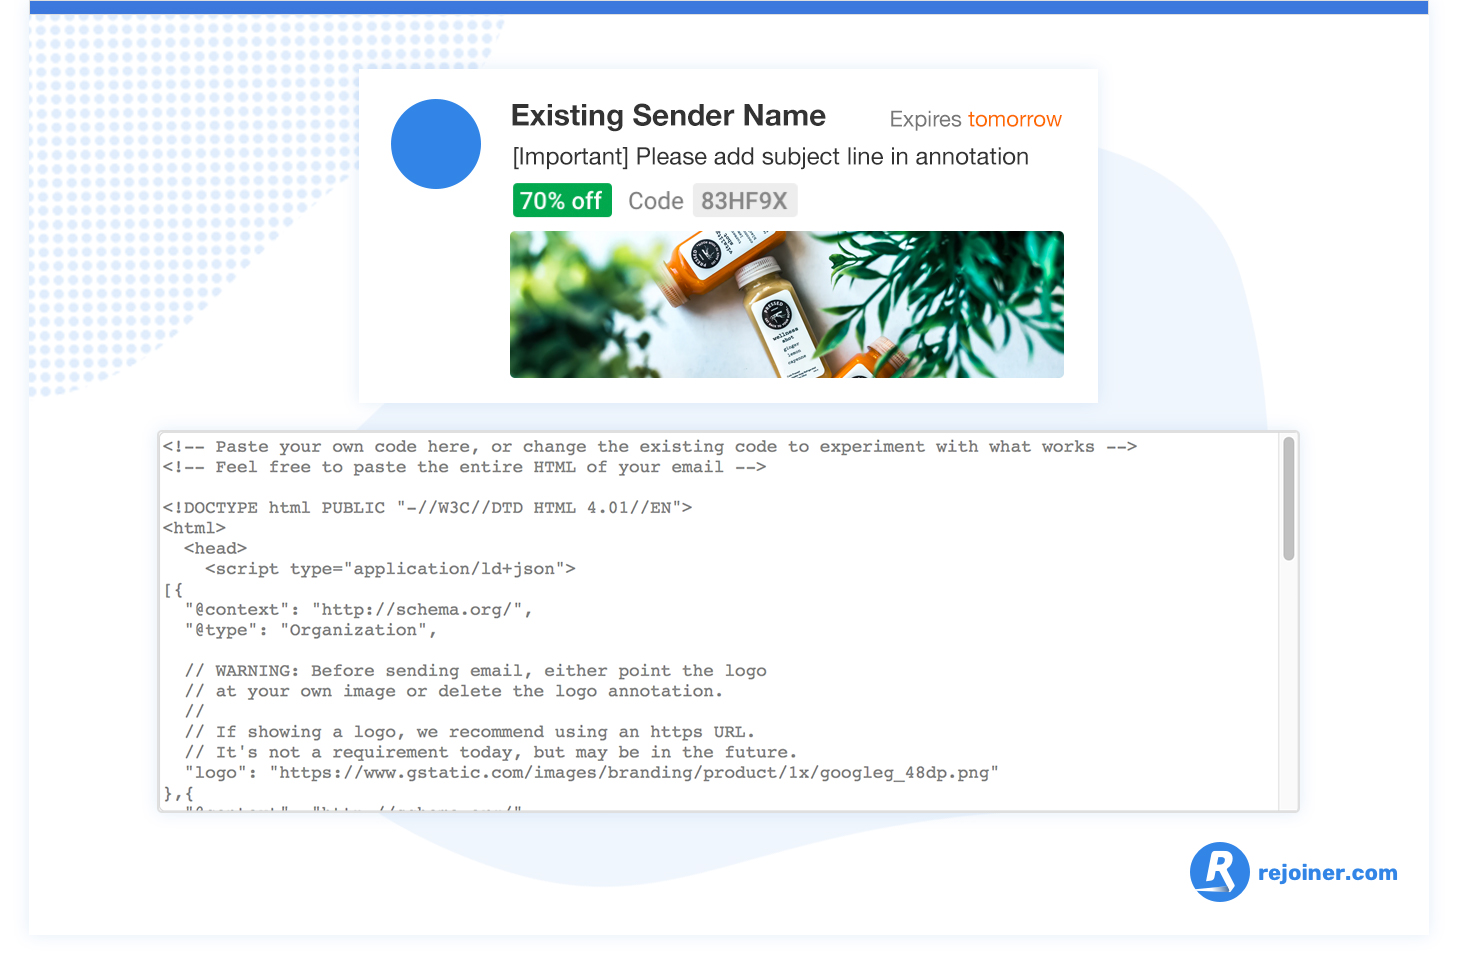
The code snippet has annotations that explain where all the information belongs. All you have to do is follow the instructions.
Then, add the customized code snippet to the HTML head of your email as JSON-LD in a script tag. Your email development team (or Rejoiner’s email development team) can help with the JSON code, if you’re not sure how to do it yourself.
Lastly, it’s a good idea to send a test email and make sure that your Gmail annotations are showing correctly in a live inbox. You can do this as part of your seed list test.
Also, since your expiration dates and discount codes will change, you should add checking your Gmail annotations to your email production workflow. Otherwise, you might send out emails with incorrect expiration dates or invalid codes.
Once everything is set, monitor your email marketing metrics—primarily your open rates, but your conversion rates may improve, as well—to see how annotating your emails impacts your email campaigns.
If everything is implemented correctly, you won’t have to be afraid of the promotions tab anymore. And you should see a lift in your email marketing ROI. Even if it’s small, every bit counts.
What to do now
Did this Gmail annotations guide help you improve your email marketing? Subscribe for more posts just like this one.
Learn how to set up BIMI authentication and make your emails even more compelling in the inbox.
Schedule a free strategy session to find out how easy it is to have Rejoiner handle all this for you.

