


78% of companies also have email deliverability issues. And 21% of opt in emails never land in an inbox.
For email marketing campaigns, email deliverability issues mean lost revenue.
How does this affect the bottom line? It’s estimated that deliverability issues cost European email marketers 53.2 million euros per day. That’s a total of 19.4 billion euros per year.
You can bring these numbers even closer to home. Check your average order value. That’s about how much it costs you when one of your legitimate emails is mistakenly sent to the spam folder or blocked.
And you can go one step further: multiply your average order value by the number of undelivered marketing emails. That’s about how much email deliverability issues could be costing your business, in total.
To stay ahead of these hidden costs, tools like GSignal’s Gmail reputation monitoring proactively alert you before Gmail blocks start impacting revenue.
Here’s what you need to know to correct email deliverability issues and avoid losing sales.
What is email deliverability?
Email deliverability is a measure of how well your email system delivers emails to subscribers’ inboxes. Emails that do not reach a subscriber’s inbox are usually directed to the spam folder, bulk email folder, or completely blocked by an email service provider (ESP).
When evaluating email campaigns, email marketers often use the email delivered rate as a metric for measuring email deliverability. But having an email delivered just means that the email didn’t bounce.
A delivered email could end up in the recipient’s inbox, the spam folder, or get blocked. So the email delivered rate doesn’t tell the entire story.
A better way to measure your email deliverability is to evaluate a combination of email marketing metrics that help you determine where your emails are ending up, and why they’re ending up there. The following are a good combination of metrics to track:
- Delivered Rate (this helps evaluate the quality of your email list).
- Rejected Rate (this indicates how many of your emails are being rejected because of sender reputation issues). Monitoring reputation trends daily through GSignal makes it easier to catch problems before they snowball into widespread blocking.
- Open Rate (you can use your open rate in tandem with the other two metrics to identify where your emails are going, since emails that don’t land in the inbox don’t get opened).
- Inbox Placement Rate (not all ESP’s showcase this metric. However, it’s used to determine the percentage of your sent emails that actually hit recipients’ inboxes).
If your ESP tracks inbox placement rate, it’s pretty much a slam dunk for monitoring email deliverability. If your ESP doesn’t offer inbox placement rate tracking, keep an eye out for unexpectedly low open rates coupled with high rejected rates.
In the rest of this post we’ll dig into the various aspects of deliverability, and what every email marketer can do to make sure their email marketing campaigns hit subscriber inboxes.
Email deliverability best practices
Yes, customer interaction is key to ensuring that your subscribers believe your emails are legitimate and valuable. But email deliverability best practices focus mainly on ensuring that computers can tell that your emails are legitimate.
Here’s how to dodge the spam filters:
Set up email authentication standards
Proper email authentication does four things for your email campaigns:
- Identifies the origin of your emails.
- Confirms that the source of your emails is legitimate.
- Proves that your emails have not been altered in transit.
- Communicates to email service providers which authentication protocols are supposed to be used to authenticate your emails.
Your email authentication infrastructure enables spam filters to separate your emails from spam and malicious emails like phishing campaigns.
The best email authentication system involves multiple email authentication protocols. And all of these protocols must be applied to each domain that you send email from.
It may seem excessive to use multiple authentication standards for your emails. But there are two main reasons to do this:
- Some ISPs do not support all authentication standards. If your emails are not authenticated using a standard that a receiving ISP supports, they may be rejected, or flagged as spam.
- Using more than one authentication standard better protects your emails from being used in email attacks.
In most cases, your ISP or email service provider can setup any email authentication you need upon request. These are the authentication standards you should use:
SPF authentication
SPF (Sender Policy Framework) authentication checks emails with the sender’s IP address. SPF authentication verifies that the email sender is who they say they are.
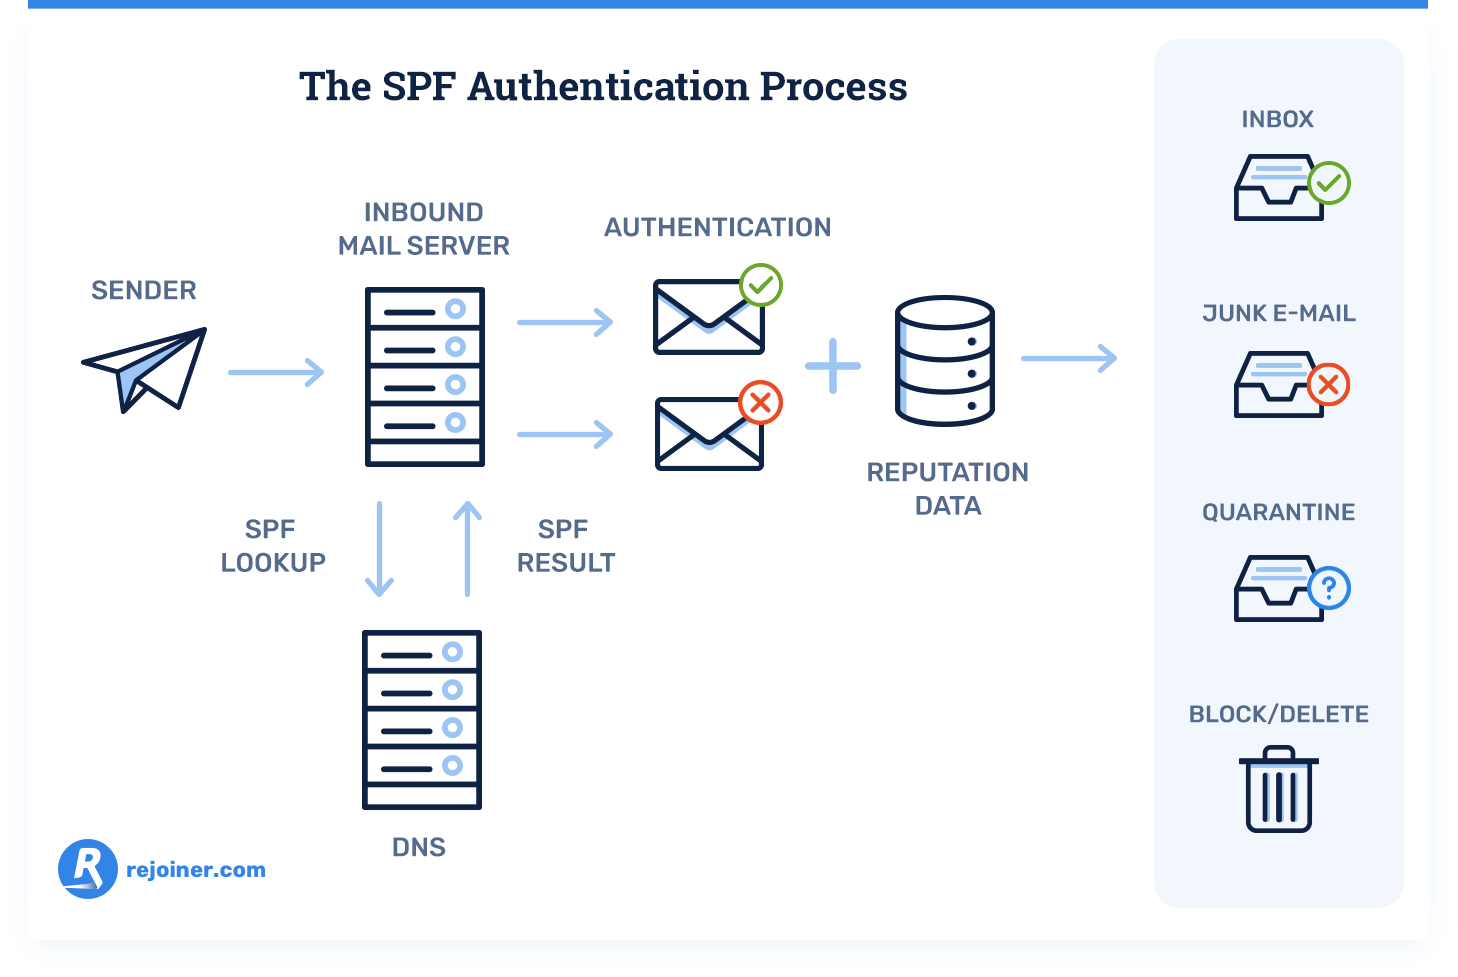
Let’s explain this image in more detail:
- The receiving domain compares the sender’s IP address to a list of authorized IP addresses in the sending domain’s DNS records.
- If the sending domain’s IP address is on the list of authorized IP addresses, the receiving domain places the email in the recipient’s inbox.
- SPF is setup in your domain’s administrative console, and checks authentication based on the domain used in the SMTP MAIL FROM header field. This is also called the Envelope-From or Return-Path address.
- An incorrect SMTP MAIL FROM address is the main cause of SPF authentication failure.
Most of the information used for SPF authentication is invisible to typical email subscribers. The From Address is visible to the email recipient. But this address is only involved in SPF authentication if it matches the SMTP MAIL FROM address.
A simple SPF record should look like this:
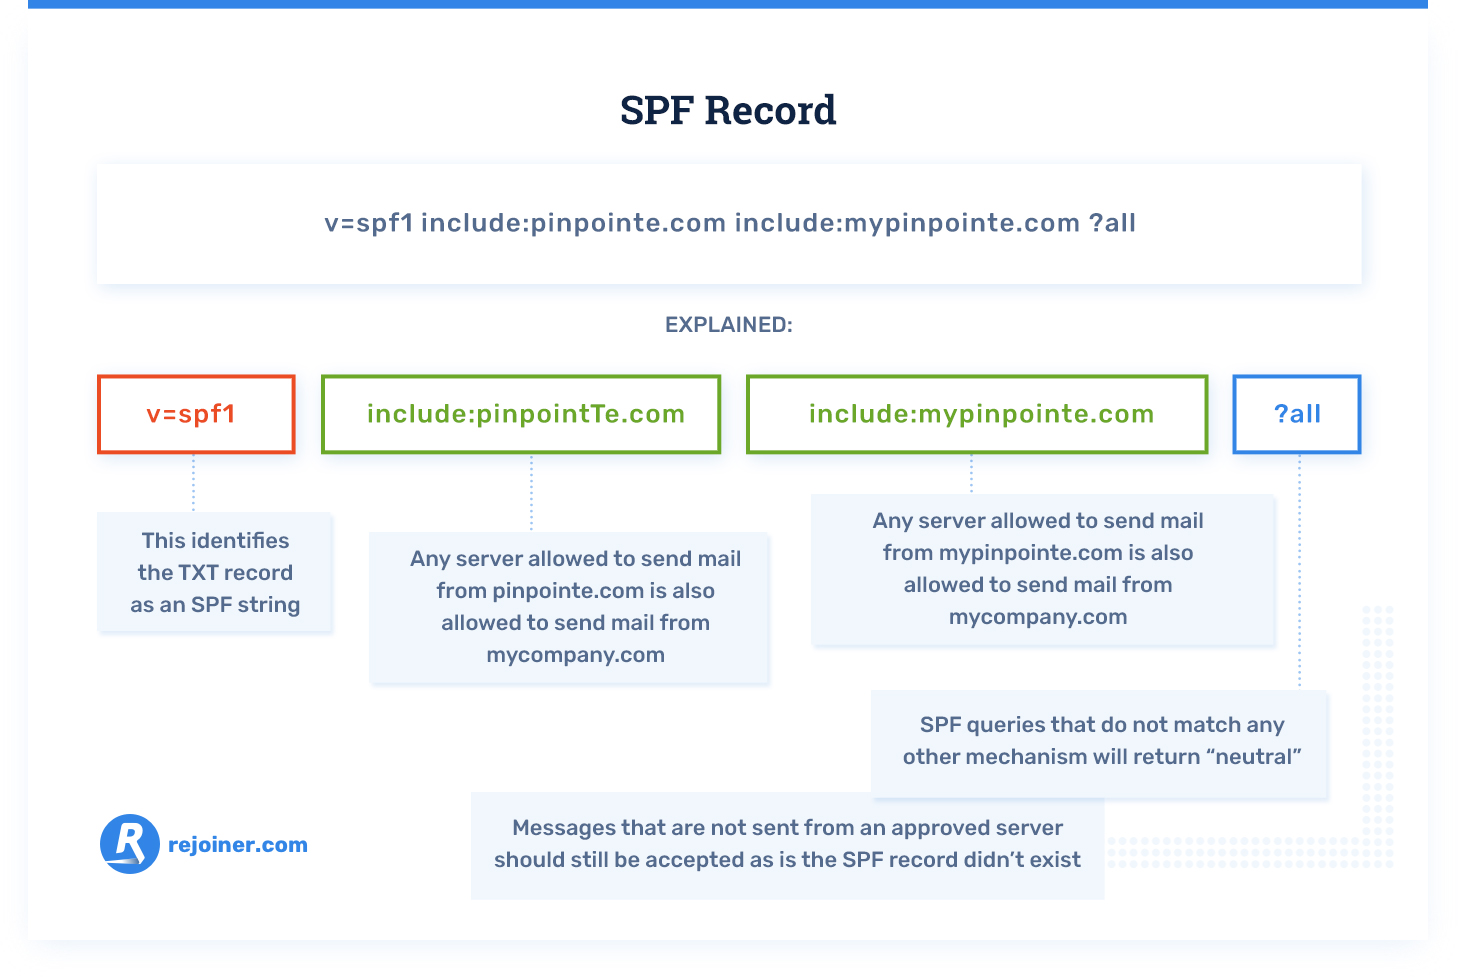
This is a more complex SPF record that also specifies a dedicated IP addresses:
v=spf1 include:spf.protection.outlook.com ip6:2001:db8::/32 ip4:203.0.113.6 –all
SPF authentication also limits the number of DNS lookups an email server is allowed to make to 10.
This limit is imposed in order to protect domains from denial of service attacks. In order to avoid SPF authentication failure because of too many DNS lookups, it’s best to minimize the number of “include” commands in the SPF record for your domain.
To know if your domain’s SPF records are valid, run an SPF check.
Or earn more about setting up your SPF records: What is an SPF record?
DKIM authentication
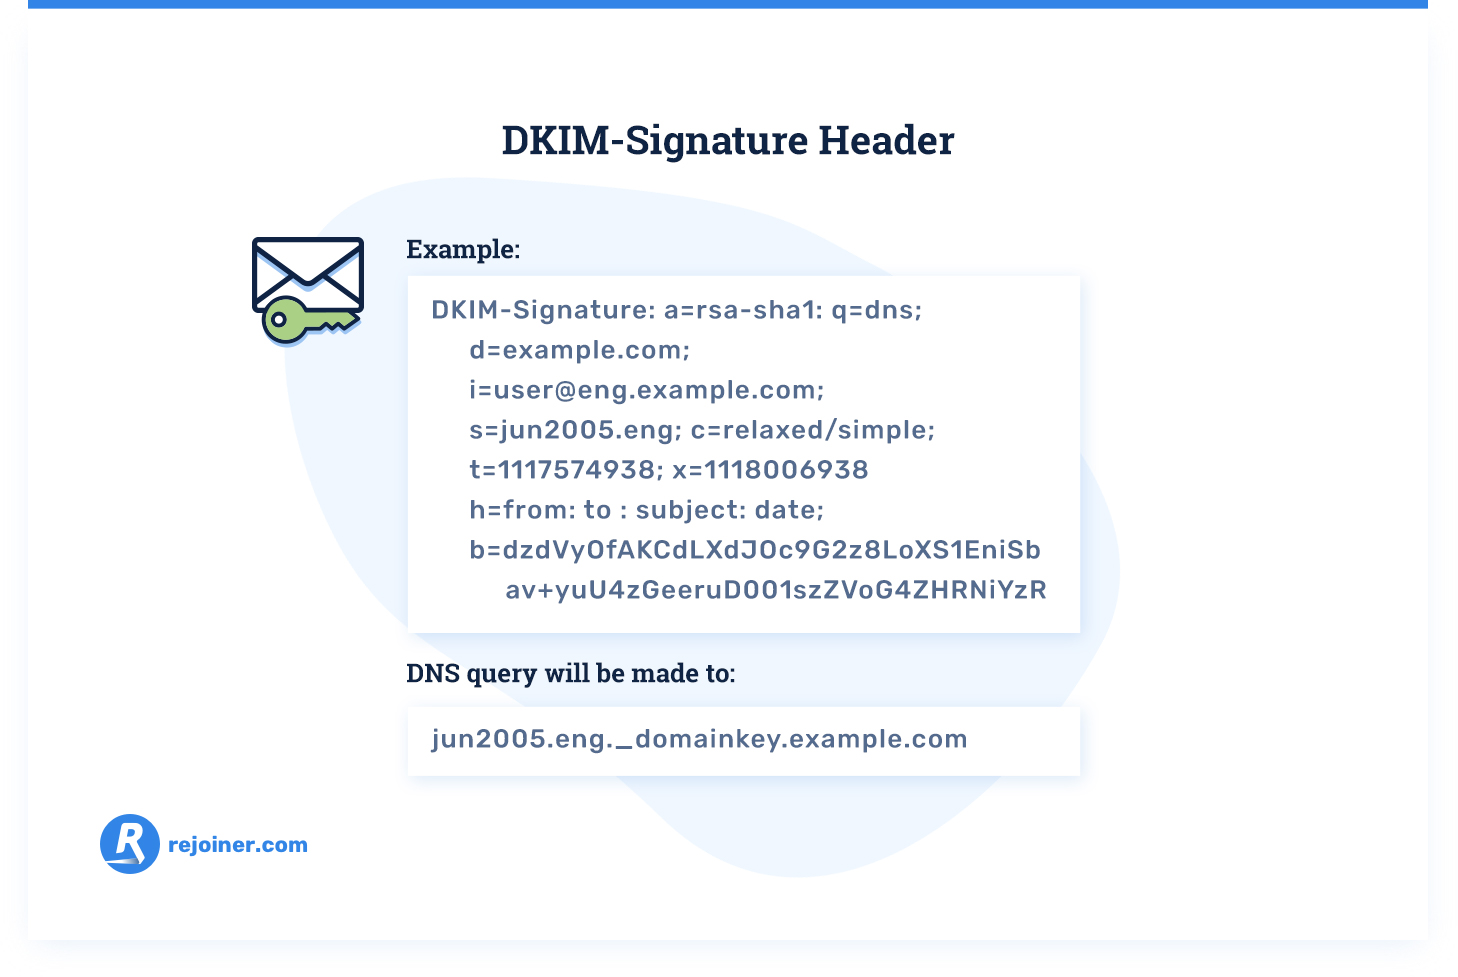
DKIM (DomainKeys Identified Mail) uses an encryption key to authenticate emails. DKIM ensures that emails have not been modified in transit from the sender to the recipient.

Here’s what’s going on in this graphic:
DKIM encrypted messages include an authentication signature. The authentication signature tells the receiving domain where the decryption key for the email is located. The decryption key is listed in the sending domain DNS record.
Since only the true domain owner (or someone they authorize) can publish domain DNS records, the DKIM authentication signature associates the email with the domain owner.
If the matching decryption key cannot be located in the domain DNS record, the DKIM authentication fails.
However, failed DKIM authentication doesn’t guarantee that your email will be rejected or sent to the spam folder. Successful DKIM authentication reduces your email’s spam score. A lower spam score means that your email is less likely to be sent to the spam folder.
Emails that fail DKIM authentication may still be delivered to the recipient’s inbox. They simply have [SPAM] added to the subject line as a warning.
However, if a DKIM failure—combined with information about the sending domain—indicates a very strong probability that the email is spam, many email servers will reject the email.
For example, Gmail doesn’t deliver email from eBay or PayPal that fails DKIM authentication. Gmail knows that eBay and PayPal use strong email authentication systems. So, failed DKIM authentication is a very strong indication that the sending domain is spoofed.
The DKIM signature is part of the RFC2822 header field. This is how a correct DKIM signature looks:
Without a signature for DKIM authentication, your emails are more likely to be marked as spam. And some email servers will just reject the emails.
To know if your emails are being sent with DKIM authentication, run a DKIM signature check.
Or learn more about setting up your DKIM record: What is a DKIM record?
DMARC
DMARC (Domain-based Message Authentication, Reporting and Conformance) is an additional layer of authentication built on SPF and DKIM that blocks fraudulent emails. DMARC adds additional authentication parameters such as reporting, policy definition, and identity alignment.

Major email providers, such as Gmail and Microsoft, require DMARC compliant authentication for all emails. So adding a DMARC record for your domain and properly configuring your SPF and DKIM authentication to be DMARC compliant improves your email deliverability, especially to major email inbox providers.
DMARC for a domain is configured using a DNS TXT record. A DNS TXT record is added to the “_dmarc” subdomain of the domain that needs DMARC configured. The DNS TXT record defines the policy for the domain.
This is a DMARC record for example.com:
v=DMARC1; p=quarantine; rua=mailto:dmarc_agg@example.com; ruf=mailto:dmarc-reports@example.com
Additionally, if spammers use your domain for sending spam, DMARC authentication parameters protect your sender reputation, and help keep your email domain off blacklists.
To know if your emails are DMARC compliant, run a DMARC records check.
Or learn more about setting up your DMARC authentication: What is DMARC?
Reverse DNS Lookup
Reverse DNS lookup is similar to SPF in that it uses IP addresses to authenticate emails. However, reverse DNS lookup works from the IP address to the domain name, rather than the other way around.
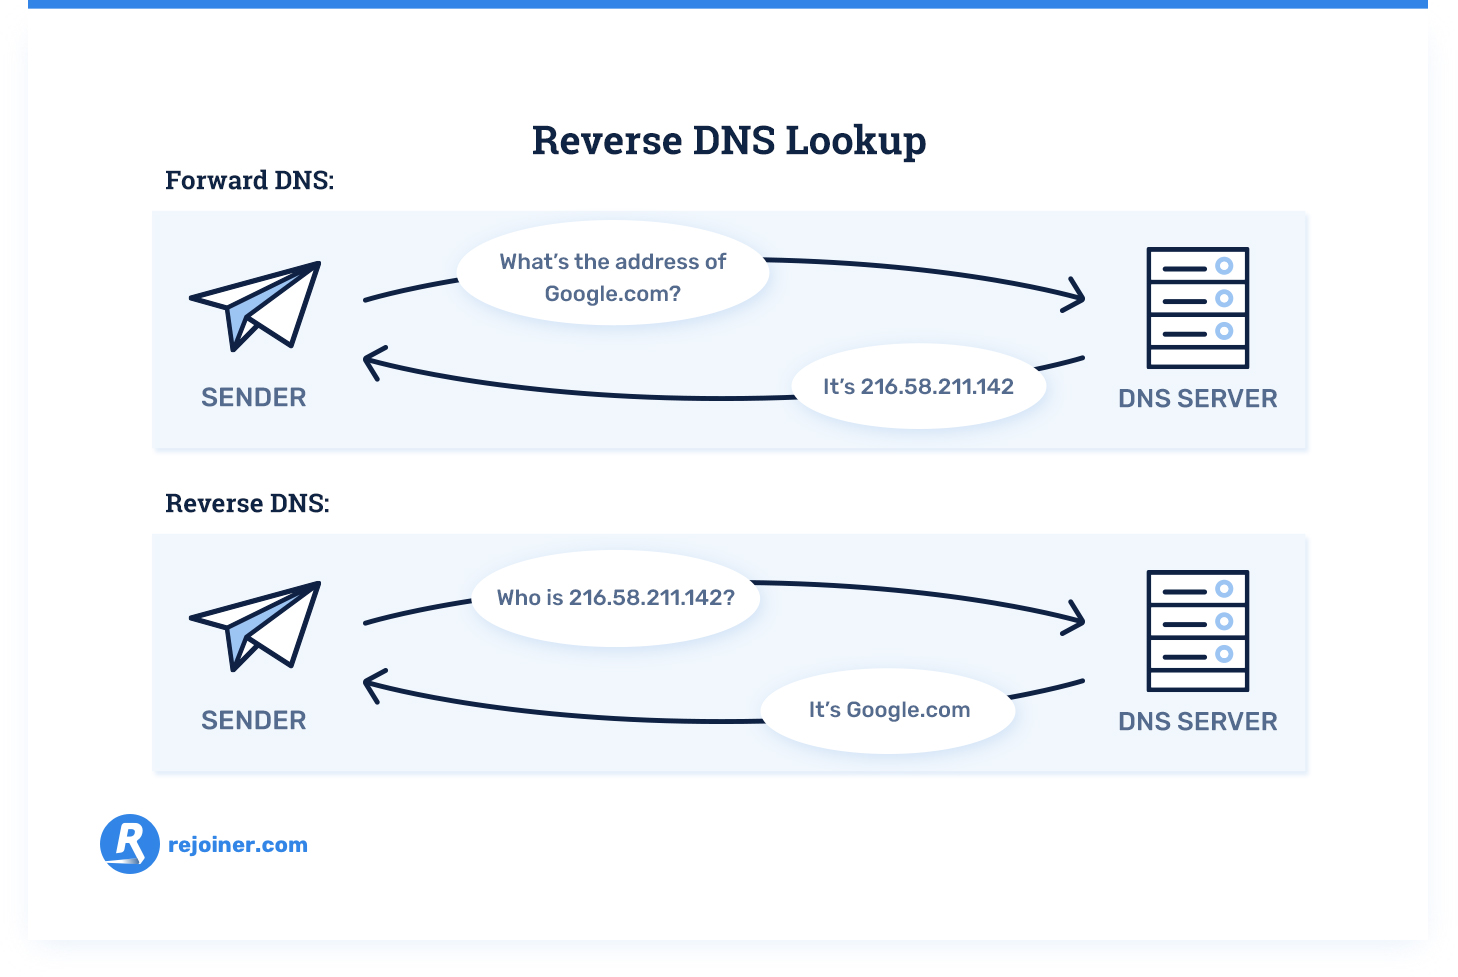
On the internet, the domain name system (DNS) attaches IP numbers to each domain name on the internet.
For example, Rejoiner.com has an assigned IP number that computers use to identify Rejoiner.com on the internet. In short, people use domain names to find places on the internet, and computers use numbers to find the same places.
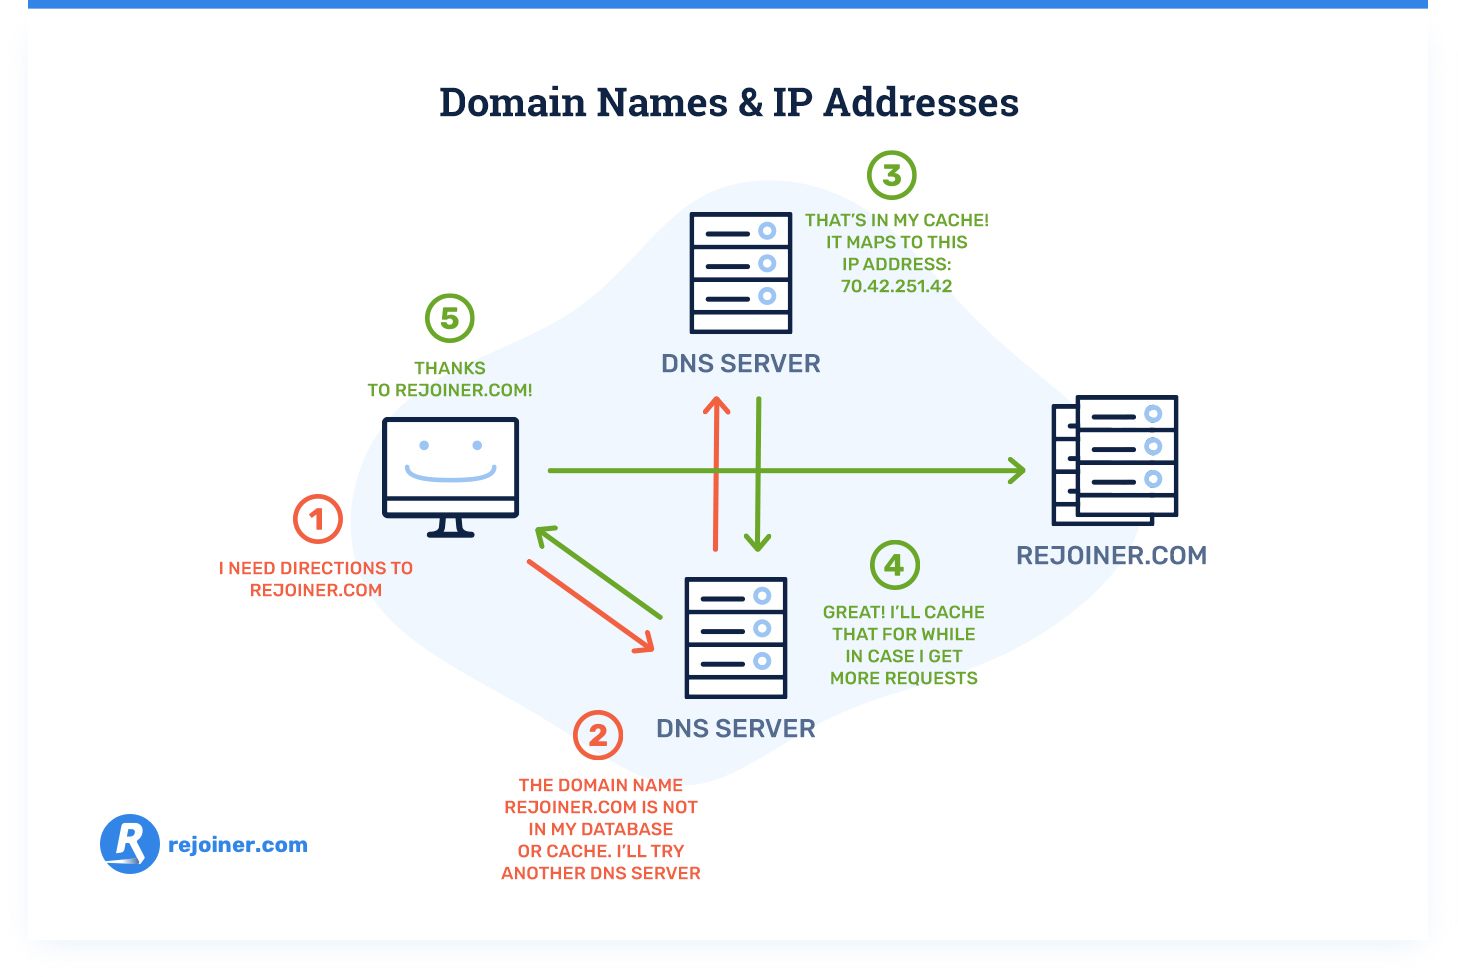
Reverse DNS lookup authenticates emails by checking the domain that an email says it’s from, then looking up the IP address that the email was sent from. Lastly, the reverse DNS lookup makes sure that the domain name associated with the IP address is the same as what’s included in the email.
So if your email server gets an email from an IP address that claims to be from Rejoiner.com, reverse DNS lookup will check the IP address. If the IP address routes back to Rejoiner.com, the email will be placed in your inbox.
If the IP address routes to a different, unauthorized domain, the email gets tossed in your spam folder.
But trouble occurs when domain servers don’t have DNS records setup. In this case, the reverse DNS lookup comes back blank. This looks suspicious to most email servers, and they will often reject your emails.
The results of a reverse DNS lookup should look like this, if your reverse DNS records are properly set up:
IP address 1.2.3.4 resolves to mail.domain.com.
Host name mail.domain.com resolves to IP addresses 1.2.3.4 and 5.6.7.8.
Thus, reverse DNS for IP address 1.2.3.4 is forward confirmed.
If you need to know if your reverse DNS records are setup, run a DNS records check.
HELO to IP
The HELO command is used in conjunction with other authentication methods, usually SPF. However, invalid HELO syntax can cause your emails to get stopped by authentication services.
If you are getting messages from mail servers saying they have rejected your emails, it’s possible that your HELO command is not correct. These are the two most common HELO issues:
- Incorrect email client or account settings.
- The domain name in the HELO command is not a fully qualified domain name.
For the vast majority of users, the first problem is the culprit. To solve this, check the settings in your email program (eg. Outlook, Thunderbird, etc.), and make sure that it’s setup to use SMTP authentication.
If this doesn’t solve the problem, then it’s possible there is an invalid domain in the HELO command.
Usually, your ISP or email provider will be able to take care of this issue if you contact them. But, the domain name in your HELO command should be a fully qualified domain name that looks something like this:
HELO mta1.mycompany.com
This issue with the domain name is most often only a problem if you use a mass email provider.
Suppress inactive subscribers
There are subscribers on your list who never interact with your emails. They never open them. They may even mark your emails as spam, rather than just unsubscribing.
But, even if they don’t mark your emails as spam, inactive subscribers can be bad for your sender reputation, and therefore your email deliverability.
Email service providers monitor how people interact with your emails. When people never open your emails or delete them without opening, it sends negative signals to mailbox providers.
These negative signals indicate to email servers that your emails might be spam. This can damage your sender reputation.
Inactive subscribers also reduce your email marketing performance. They’re never going to engage with your emails. All they do is reduce your email open rates and other engagement metrics.
Since you’re sending emails to them, inactive subscribers also reduce your email marketing ROI.
Clearly, it’s best that you remove inactive subscribers from your email lists.
Fortunately, it’s fairly easy to remove inactive subscribers.
You simply establish a sunset policy, which determines how long subscribers stay on your list without engaging with your emails before you remove those subscribers.
Your sunset policy should be based on how often you send emails. The more often you send emails, the more negative signals inactive subscribers will send to email service providers.
So, if you send emails frequently—like a daily email—you should remove inactive subscribers quickly. If you only send an email or two a month, you can give inactive subscribers more time to engage with your emails.
In either case, once you’ve established your sunset policy, stick to it. Establish a schedule for checking your email lists and removing inactive subscribers.
If you need help with this, learn more about removing inactive subscribers from your lists: How to stop sending emails to inactive subscribers.
Protect your email lists with email validation
The quality of your subscriber lists often gets overlooked as a method for improving email deliverability.
But sending emails without knowing anything about the emails on your list can be dangerous for your sender reputation.
Yes, people often give fake email addresses to avoid marketing emails. Sending messages to invalid and misspelled email addresses is bad for your email marketing ROI and your sender reputation.
However, sending emails to spam traps or bots is even worse for your sender reputation. But spam traps and fake email addresses aren’t the only email addresses you should avoid. There are several different types of email addresses that are dangerous to your sender reputation:
- Disposable emails.
- Spam trap emails.
- Invalid emails.
- Misspelled emails.
- Catch-all emails.
- Emails from new domains.

There are services that can check your lists and remove these kinds of email addresses. If you to validate your email lists, try these tools:
Or learn more about validating your email lists: How to protect your email list with email validation.
Implement seed list testing
Seed list testing is a method of validating your email deliverability before you send an email to your entire list.
This way, if there’s a deliverability issue with an email, you can identify it and correct it using a small sample size, so that a mistake or deliverability issue doesn’t have a serious effect on your sender reputation.
And seed list testing also helps you verify that your emails display properly on various devices and email clients. So seed list testing is an all-around quality control.
Seed list testing isn’t just an email deliverability best practice, it’s an all-around email marketing best practice. You shouldn’t use your entire email list as a guinea pig for new emails and email campaigns. That’s what your seed list is for.
Your seed list should be a small number of email addresses, that accurately represents your entire email list in terms of mailbox providers, internet service providers, and devices.
Once you’ve sent an email to your seed list, and corrected any problems, you can be sure that there won’t be issues once the email goes out to your whole subscriber base.
Learn more about creating a seed list and running seed list tests: How to verify inbox placement with seed list testing.
Setup Google Postmaster Tools
Google Postmaster Tools are a set of tools that track email deliverability metrics—domain reputation, spam rate, email authentication, and other email deliverability data.
Using Google Postmaster Tools enables you to monitor your email deliverability, spot issues, and correct them. Also, they’re easy to set up.
Learn how to setup Google Postmaster Tools.
Domain reputation and IP reputation explained
We’ve talked quite a bit about sender reputation. Now it’s time to explain it.
Your sender reputation is a bit like a credit score. A good reputation means that email servers have more trust that your emails are legitimate. And a bad reputation means that email servers will be more skeptical of your emails.
The standard method of measuring email reputation is through tracking the email activity from IP addresses.
Email providers like Gmail, Microsoft, and Yahoo! only want to deliver email that their users want. An emailer’s reputation is one metric email providers use to determine whether they send emails from that IP address to the inbox or the spam folder.
Your IP reputation is based on:
- Complaint rates (a complaint ratio of less than 1 complaint per 1000 emails is best).
- User engagement (how often your emails get opened and how many clicks your emails get).
- Unsubscribe rates (evaluates how relevant your emails are and if you’re sending emails to people who have opted in to email lists). Use a double opt-in to reduce unsubscribe rates.
- Email list quality (avoid spam traps, bot emails, and other toxic inboxes).
- Email quality (based on authentication standards, email formatting, and HTML optimization).
Usually, your sender reputation is attached to your domain’s IP address (the number that computers use to identify your website on the internet). However, this can cause problems if a domain changes IP addresses because the domain loses its IP reputation.
Spammers can exploit this by switching IP addresses. And companies with good IP reputations can lose their good standing if their IP address changes. This is why domain reputation is becoming more common.
Domain reputation is measured the same way that IP reputation is measured. However, the reputation is not lost if the IP address changes.
So companies can take their good reputation with them if they need to move to a new ISP. And spammers can’t wipe away their bad reputation by changing IP addresses.
But using domain reputation means that these email best practices are more important than ever:
- Always send transactional emails from a different domain and IP address than your marketing emails. This ensures that—even if your marketing emails get a bad reputation—your order confirmation, order receipt, and other critical emails will still make it to the inbox.
- Carefully employ marketing techniques in your transactional emails. Just make sure that your transactional emails do their job of delivering transaction information first and foremost. If your transactional emails get spam complaints, they’ll start going to spam folders instead of inboxes.
This doesn’t mean that you can’t add product suggestions or cross sells to your transactional emails. But you must do it right.
Ultimately, domain reputation is a bit of a double edged sword.
On one edge, you can take a good domain reputation with you to a new ISP.
On the other edge, it’s much more difficult to repair damage to your domain reputation. And you can’t reset your domain reputation with an IP address reassignment.
How to Check Your Domain and IP Reputation
There are several tools for checking your domain and IP reputation. Here are three quality reputation checkers for quick reference:
Simply enter your domain name (i.e. rejoiner.com) in the search field. You’ll quickly get a domain and IP reputation score.
Your domain reputation is important. However, ISPs still evaluate IP reputation. And any IP address attached to your domain will have its own reputation score. So it’s smart to check your IP address reputation, as well.
Send limits and proper IP warmup
Email providers also evaluate IP addresses based on their email volume, and most ISPs and ESPs have send limits for the number of emails you can send from the same IP address.
It looks suspicious when an IP address sends too many emails too quickly. And that IP address could be flagged or blacklisted. Use email throttling to ensure that your email campaigns don’t exceed send limits.
You can purchase additional IP addresses if your email list is large enough that your email marketing requires high send volumes.
But it’s important that you don’t just start blasting emails from a new IP address. That’s what spammers do. It looks very suspicious to email servers. So you must warm up new IP addresses before maxing out send volumes.
How to warm up IP addresses
When you get a new IP address, it has no reputation with email service providers. And, just like a credit score, having no reputation isn’t great.
When you get a new sending IP address, you need to ramp up your email send volume gradually. That way you build up a reputation for sending legitimate, quality emails before you start sending high volumes of emails. This is called IP address warm up.
Here are the basics of how to warm up an IP address:
Start with 100 emails a day. Then increase your send volume to your maximum number of sends over the course of 15 days. The numbers will vary based on your total email volume. But the IP warm up schedule looks like this:

It’s best to use tools to properly warm up an IP address. Manually increasing your sends each day is labor intensive. And you might make a mistake that damages your IP reputation.
Start by learning more about IP address warm up: How to warm up a new IP address.
HTML Optimization
Many spam filters and email providers also grade emails on the quality of their HTML code.
This evaluation can be avoided by sending plain text emails. But, if you use HTML in your emails, double check to make sure the HTML markup is well formed, and that there are no open or missing tags in your email HTML.
Checklist: 8 Steps to Improve Email Deliverability
Here’s how to get the best deliverability rates for your email campaigns:
- Setup proper email authentication: SPF, DKIM, and DMARC.
- Remove inactive subscribers from your email lists.
- Validate the emails in your email lists.
- Use seed list testing to verify inbox placement.
- Setup and use Google Postmaster Tools to monitor your sender reputation and inbox placement.
- Warmup all your new IP addresses. And use email throttling to avoid exceeding send limits.
- Send quality emails with email content that is relevant to your subscribers. And use good HTML optimization.
- Monitor key email marketing metrics to determine whether or not your emails are hitting subscriber inboxes. If not, find out what the deliverability issue is (Google Postmaster Tools can help).
What to Do Now
If you’d like your email program to follow the email deliverability best practices outlined in this post, schedule a FREE strategy session and we’ll make it a hands-free process for your company.

